


How to Set Up a Full-Length Sizing Die: Bump .001–.004" by Rifle (2026)
Last updated: October 2026 | By AltitudeCraft Team
To set up a full-length sizing die correctly, set it to a measured shoulder bump, not to the shell holder. Most die instructions tell you to screw the die down until it touches the shell holder and add a little cam-over. That sizes brass to the die, not to your rifle's chamber. This guide covers how much to bump the shoulder, how to set the die to hit that number, and what to do when the die is too far down or cannot go any further.
Disclosure: AltitudeCraft makes headspace comparator kits. We also use our own return comments here, because they show where reloaders most often get confused.
Key Takeaway
Setting a full-length sizing die by screwing it down to the shell holder and adding cam-over sizes brass to the die, not to the chamber, and can push the shoulder back further than needed. A more controlled method measures shoulder bump directly. Measure the base-to-shoulder length of several cases fired in your rifle with a headspace comparator on calipers. Back the die off, size one case, and turn the die down in small steps until the shoulder sits a set distance below the fired length. On a standard 7/8-14 die thread, one full turn moves the die about 0.071 in., so a 10° turn moves it about 0.002 in. Hornady's comparator instructions suggest 0.001 to 0.002 in. for full-length sizing. Reloaders commonly use 0.002 to 0.003 in. for hunting rifles and 0.003 to 0.004 in. for AR-15s. Calipers realistically repeat to about ±0.001 in., so average several readings and confirm in the rifle.

The tool for this job
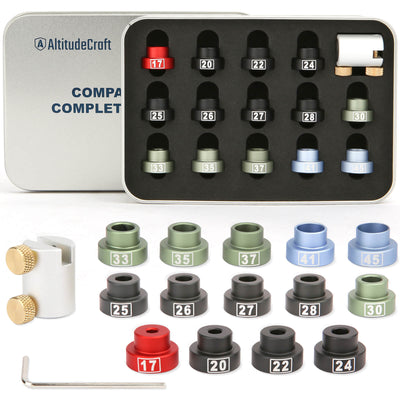
AltitudeCraft Headspace Gauge Comparator Kit with 6 Bushings
$30.99
Free shipping & free returns on US orders $25+
View productWhy does "screw the die down to the shell holder" oversize brass?
The shell-holder method oversizes brass because it ignores your chamber. A sizing die is made to size a case close to minimum dimensions so it fits any chamber built to spec. Your rifle's chamber is somewhere between minimum and maximum. With the die touching the shell holder plus cam-over, the shoulder ends up wherever the die, press and shell holder put it.
A Rokslide member who had always "set up the sizing die the way the instructions state" guessed he was "bumping way more than needed." Another replied: "If you're setting the sizing die per the instructions you may be over sizing your brass and it may not last long. The only way to know is to check it" (Rokslide forum).
The cost builds up over several firings. When the shoulder is pushed back too far, the case stretches forward again on firing, and that brass is drawn from just above the case head. One AccurateShooter member warned: "If a guy continuously bumped the shoulders back say .004", after awhile he may experience a case head separation" (AccurateShooter forum).
How much to bump the shoulder: bolt gun vs. shoulder bump for AR-15
Bump the shoulder only as far as the bolt needs to close freely: about 0.001 to 0.002 in. in a bolt gun, a little more for hunting, and the most for an AR-15. Hornady's headspace comparator instructions state: "Typically, when full-length resizing, the die should be adjusted to set the shoulder back .001" to .002"" (Hornady Lock-N-Load Headspace Comparator Kit instructions, PDF). The hunting and semi-auto ranges in the table come from experienced reloaders.
| Rifle and use | Typical bump target | Why | Source |
|---|---|---|---|
| Bolt action, target or benchrest | 0.001–0.002 in. | Least brass working; the bolt still closes | Hornady comparator instructions; AccurateShooter: ".001" bump for target work" |
| Bolt action, hunting | 0.002–0.003 in. | Extra margin for dirt, cold and a hurried bolt | AccurateShooter: ".002" for hunting"; Rokslide: "no reason to size it down more than .002 or .003" |
| AR-15 and other semi-autos | 0.003–0.004 in. | The bolt cannot be forced closed, so feeding reliability comes first | AccurateShooter: "AR type rifle… bump em back .003-.004"" |
| Tight custom action | Up to about 0.004 in. | A tight action can need more bump for a fully free bolt close | AccurateShooter: about .002" on a Savage, "closer to 0.004"" on a BAT |
That last row comes from a 2026 AccurateShooter thread on .308 F-TR. One member needed "easily 0.002"" on a Savage and "closer to 0.004"" on a BAT Neuvo for a free bolt close. SAAMI drawings define the cartridge and chamber tolerances that explain this gap. They do not specify bump values.

How do you set up a full-length sizing die step by step?
Measure several cases fired in your rifle, back the die off, then turn it down in small steps until a sized case reads your target bump below the fired length. For bushing choice and reading technique, see our headspace comparator bushing size chart and shoulder bump measuring guide.
- Collect five cases fired in this rifle, from one brass lot.
- Measure the fired baseline. Read each case three times, turning it about a third of a turn between readings. Average all five cases and write the number down.
- Back the die off. With the ram up, screw the die down until it just touches the shell holder. Then lower the ram and back the die out one full turn, which raises it about 0.071 in. on a 7/8-14 thread.
- Lube and size one case, then measure it. At this height the shoulder usually has not moved. It may even read slightly longer, because squeezing the body pushes brass forward.
- Turn the die down in steps. Go about 1/8 turn (about 0.009 in.) at a time until the reading drops below the baseline. Then switch to about 10° (about 0.002 in.) per step, resizing and measuring after each.
- Stop at your target, for example baseline minus 0.002 in. Size two or three fresh fired cases to confirm they land in the same range.
- Lock the ring and record the setting. Tighten the lock ring without turning the die. Note the target bump on a card in the die box.
- Check in the rifle. The bolt should close on an empty, unprimed sized case without extra force. If it doesn't, add about 0.001 in. of bump.
Common mistake: trusting a test case that has been sized over and over. Repeatedly sized brass springs back differently from once-fired brass, so confirm the final setting on fresh fired cases.

Erik Cortina demonstrates a precise full-length die setup in this video:
What if your full-length sizing die is too far down, or bottomed and still not bumping enough?
A full-length sizing die set too far down oversizes brass. A die that is already bottomed and still leaves a tight bolt means something other than die height is the limit. These two problems are fixed in opposite ways.
Full length sizing die too far down (cam-over setting). Measure a fired case and one sized at your current setting. If the bump is more than your target, back the die out about 1/8 turn and resize a fresh fired case. Then work back down in 10° steps as described above. Oversizing brass once does not ruin it, but check those cases for a bright ring above the case head.
Die touching the shell holder, bolt still tight. First measure whether the shoulder actually moved.
- Shoulder not bumped enough: try a shell holder with a lower deck height, or have one surface-ground. The standard deck height is 0.125 in., and holders vary.
- Shoulder bumped, bolt still tight: the case body or the area just above the case head may be too large. A small-base die or a body die sizes the body further down.
- Only some cases are tight: measure just above the case head. An expanded case head is a sign of excessive pressure, so discard that brass and review the load.
Why does shoulder bump vary from case to case?
Shoulder bump varies because brass springs back by different amounts, and because shell holder contact and lube are never perfectly consistent. Expect a spread of about 0.001 in. across a batch. Even at a 0.002 in. target, one F-TR shooter wrote, "every once in a while I still get rounds that spring-back and I have to give it a little more love to chamber."
| Cause | What happens | What to do |
|---|---|---|
| Brass hardness | Harder, more-fired cases spring back further | Sort brass by number of firings; anneal on a schedule if you anneal |
| Shell holder not touching the die | Press flex and ram stroke change the result from case to case | Redding Competition Shell Holders (+0.002 to +0.010 in.) or die shims, so the holder touches the die every stroke |
| Shell holder deck height | Holders from different makers differ | Check against the 0.125 in. standard; keep one holder with each die |
| Lube amount | Too little drags the case; too much builds up and dents shoulders | Apply lube the same way every time; clean the die |
A 2011 AccurateShooter poster found that with the die backed off, "not all cases are sized consistently, some long and some short," and switched to competition shell holders. Another sets the bump with Sinclair shims instead of resetting the die.
How precisely can you measure shoulder bump with calipers?
In practice, digital calipers with a comparator repeat to about ±0.001 in., not the 0.0005 in. the display shows. That is fine for a 0.002 in. target if you average readings.
In the October 2026 F-TR thread, one member who had compared his Mitutoyo caliper against a micrometer many times wrote: "you are kidding yourself if you believe you can accurately measure to .0005" with a digital caliper" and "accuracy of +/- .001-.0015 is more realistic." The same shooter bumps his own 6BRA cases .0015 in. with a Whidden full-length bushing die.
- Use the same pressure every time. Close the jaws gently and evenly; squeezing harder can shift the reading by 0.001 in. or more.
- Rotate and average. Take three readings at different rotations. If one is far off, look for a dented shoulder or dirt in the bushing.
- Compare, don't read absolutes. Brands give different numbers for the same case; only fired-versus-sized matters.

What is wrong when sized cases won't chamber or the bump changes?
Most full-length sizing problems come down to too little bump, too much bump, or a setup that changes from stroke to stroke. Match the symptom before you move the die.
| Symptom | Likely cause | Fix |
|---|---|---|
| Bolt closes hard on a sized, empty case | Not enough bump, or the body is not sized enough | Measure; turn the die down about 10° (≈0.002 in.); see the bottomed-die section |
| Some .223 AR rounds chamber and some stick | Die set by eye with "daylight" under it | Set a measured 0.003–0.004 in. bump; check deck height (0.125 in.) |
| Bump varies 0.002 in. or more in one batch | Shell holder not touching, mixed brass history, uneven lube | Competition shell holder or shim; sort brass; consistent lube |
| Bright ring above the case head, or a groove inside you can feel with a bent wire | Repeated oversizing has thinned the brass | Discard those cases; reduce the bump |
| Same case gives different readings | Uneven caliper pressure, dirty bushing, dented shoulder | Clean the bushing; rotate and average; light, even pressure |
The AR-15 row comes from a 2019 AccurateShooter thread. The reloader left "a small amount of daylight between the base of the die and the shell holder," and some of his 200 rounds of .223 would not chamber.
What does a headspace comparator not do? What our return data shows
A headspace comparator measures from the case head to the shoulder. It does not measure bullets, seating depth or straight-wall pistol cases. We reviewed all 72 Amazon returns of our headspace kit (SKUs AC270 and AC270-V01) from late 2024 to October 2026:
| Amazon return reason code | Returns |
|---|---|
| Ordered wrong item | 23 |
| Unwanted item | 18 |
| Not as described | 7 |
| Undeliverable | 5 |
| Defective | 4 |
| Missed estimated delivery | 3 |
| Poor fit | 2 |
| Quality unacceptable | 2 |
| Missing parts | 2 |
| Other reasons (2 or fewer each) | 6 |
The largest single group, 23 of 72, ordered the wrong item; only 6 cited a defect or quality problem and 2 reported missing parts. The most common comments came from buyers who expected a bullet comparator, or a fit for 9mm. If you need both measurements, the bullet and headspace gauge comparator kit includes bushings and inserts.

Do you need a headspace comparator to set up a sizing die?
No, but you need some way to compare fired and sized cases, and a comparator is the most repeatable low-cost option. As one Rokslide member put it, "You don't need any of it but it goes a lot quicker if you do."
| Method | What you need | Strengths | Weak points |
|---|---|---|---|
| Headspace comparator on calipers | Calipers, comparator body, bushing for your cartridge | A number you can record and repeat | Limited to caliper repeatability (about ±0.001 in.) |
| Inverted 9mm case on the shoulder | Calipers and a fired 9mm case | Free; fine for a quick check | The case mouth is not a precise reference, so readings repeat less well |
| Bolt-close feel (Wheeler method) | The rifle, with the firing pin assembly removed | Matches the actual chamber | No number to record unless you also measure |
| Benchtop headspace gauge | A dedicated dial or digital gauge | Steady spring pressure; fast for big batches | Costs more; still a comparison, not true headspace |
Our kit has a dual-screw comparator body that clamps to the caliper blade, color-coded hard-anodized bushings (A .330, B .350, C .375, D .400 and E .420), and an F .188 blank for custom sizing. It is still a caliper add-on, so it is only as good as your calipers and technique. If you already own a benchtop gauge, you don't need it.

Frequently Asked Questions
Is a 0.002 in. shoulder bump enough?
For most bolt-action rifles, yes. A 0.002 in. bump is at the top of the range Hornady suggests for full-length sizing, and it lets the bolt close freely while working the brass very little.
How much should I bump the shoulder for an AR-15?
Reloaders commonly use 0.003 to 0.004 in. for an AR-15, because a semi-auto bolt cannot be forced closed on a tight round. Set the die to a measured bump, not to "daylight" judged by eye.
Can I use a headspace comparator on 9mm or other pistol cases?
No. A 9mm Luger case has no shoulder; it headspaces on the case mouth. A headspace bushing needs a shoulder to sit on. Use a pistol case gauge or a maximum-length check for straight-wall cartridges.
Why does the bullet slide straight through the headspace bushing?
That is by design. Headspace bushings are larger than the neck and bullet so they can stop on the shoulder. To measure to the bullet ogive (cartridge base to ogive, or CBTO), you need a bullet comparator insert, not a headspace bushing. The comparator reading is also not your rifle's true headspace. It is a comparison number for fired versus sized cases.
Can I resize loaded rounds that won't chamber?
Reloaders on AccurateShooter advised against it, because it puts sizing force on a primed, charged round. Pull the bullets, resize the empty cases with a correctly set die, and reload them.
Related guides
- Headspace Comparator Bushing Size Chart: Which Bushing Fits Your Cartridge?
- Which Comparator for 6.5 Creedmoor? Insert, Bushing and Shoulder Bump Setup
- How to Measure CBTO With a Bullet Comparator
- OAL Gauge Guide: How to Measure Distance to the Lands
- Bullet Comparator FAQ: Inserts, OAL vs CBTO and Caliber Guide
- Bullet Comparator Kit With 14 Inserts
- Overall Length Gauge for Bolt-Action and Single-Shot Rifles
The bottom line
Don't set a full-length sizing die by the shell holder and hope for the best. Measure five fired cases, back the die off one turn, and work down in small steps to the bump for your rifle in the table above. Lock the ring, record the setting and confirm the bolt closes. For bottleneck rifle cartridges, our headspace gauge comparator kit handles the measuring step.
About the author
The AltitudeCraft Team designs and supports precision reloading measurement tools, including headspace comparators, bullet comparators and overall length gauges. This guide combines our return data with Hornady's published instructions and attributed reloader discussions. We did not run new laboratory tests for it.
Featured in this guide
AltitudeCraft Headspace Gauge Comparator Kit with 6 Bushings
$30.99
Free shipping & free returns on US orders $25+
View productRelated Articles
 How to Measure Throat Erosion With an OAL Gauge (and Know When Your Barrel Is Done)
Oct 25, 2026
 Which Hornady Comparator for 6.5 Creedmoor? Insert, Bushing, and Shoulder Bump Setup (2026)
Oct 15, 2026
 Bullet Comparator Insert Chart: Which Insert Fits Your Cartridge (2026)
Aug 31, 2026
 Lock-N-Load Bushing Won't Lock? Diagnose Spin, Slop, and Fitment (2026)
Aug 09, 2026
