




How to Use a Miter Saw Protractor: The Setting Is Not Half the Corner Angle (2026)
Short answer: the number you dial into a miter saw is not half the angle you measured in the corner. A miter saw scale reads 0° for a square crosscut, so it is already referenced off 90°. The conversion is saw setting = (180° − corner angle) ÷ 2, which is the same as 90° − (corner ÷ 2). A 90° corner gives 45°, which is why the wrong rule survives — at exactly 90° both formulas agree. They diverge everywhere else: a corner that measures 92° needs 44°, not 46°, and an 86° corner needs 47°, not 43°. Halving the corner reflects your error across 45° and doubles the gap instead of closing it. A two-scale miter protractor exists precisely so you never do this arithmetic: its inner scale is pre-converted and you read the saw setting directly.


The tool for this job
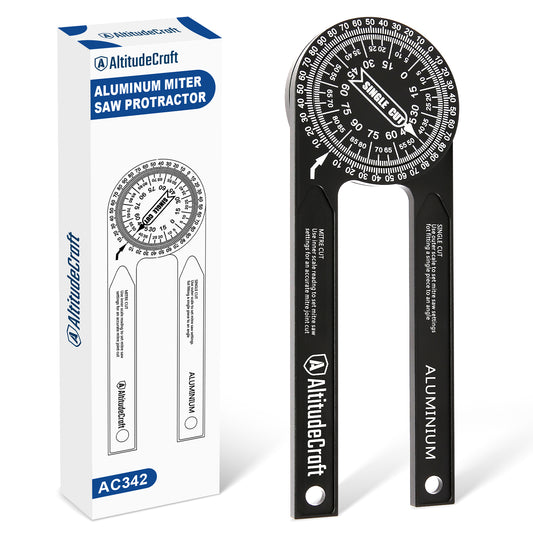
AltitudeCraft Precision Aluminum Miter Saw Protractor
$20.99
Free shipping & free returns on US orders $25+
View productThe mistake that ruins the joint: “corner ÷ 2”
Almost every gap in a baseboard or casing joint traces back to one confusion: the angle of the joint and the number on the saw are two different numbers.
Two pieces of trim meeting in a corner that measures 90° each contribute 45° of joint. You set the saw to 45. So far the “divide by two” rule looks correct. It is not correct — it is a coincidence. At 90°, halving the corner and subtracting the half-corner from 90 happen to produce the same answer.
Move one degree off square and the two rules separate, in opposite directions:
| Measured corner | Each piece’s share of the joint | Correct saw setting (180 − corner) ÷ 2 |
What “corner ÷ 2” tells you | Error in the finished joint |
|---|---|---|---|---|
| 90° | 45° | 45.0° | 45.0° | 0° (the coincidence) |
| 92° | 46° | 44.0° | 46.0° | 4° open |
| 88° | 44° | 46.0° | 44.0° | 4° open |
| 86° | 43° | 47.0° | 43.0° | 8° open |
| 93° | 46.5° | 43.5° | 46.5° | 6° open |
| 135° | 67.5° | 22.5° | 67.5° (impossible) | saw will not reach |
| 120° | 60° | 30.0° | 60.0° (impossible) | saw will not reach |
Notice the pattern in the last column. Halving the corner does not leave a small residual error — it mirrors your setting across 45°. On a corner that was only 2° out of square you open a 4° gap, and you open it in the direction that makes the joint worse. That is why so many people report that their careful measurement made the joint less accurate than eyeballing 45°.
Gary Katz put the same trap in plain language in THISisCarpentry, using an 86° corner: “You first bisect the angle and determine that the miter should be 43 degrees. But when you set your saw at 43 degrees and cut the piece, the miter is NOWHERE near close! That’s because 43 degrees on a standard power miter saw gauge is really 47 degrees.” He traces the reason to the saw’s heritage: miter gauges are laid out off 90° to the fence, the way a framer measures every rafter cut off the back of the stock.
A correction we owe you
An earlier version of this page taught the wrong rule. It printed “Miter Saw Setting = Measured Corner Angle ÷ 2” and a reference table that told readers to set 46° for a 92° corner and 67.5° for a 135° corner. Both are wrong, and the second is not even reachable on a standard miter saw. That table has been replaced with the one above. If you cut trim from the old table, the good news is that the fix is mechanical: your setting was reflected across 45°, so a 46° cut should have been 44°, and so on. We are publishing the error rather than quietly deleting it, because the whole reason this page exists is that the arithmetic is easy to get backwards.

So why does a miter protractor say “no calculations needed”?
Because a proper miter protractor does the conversion in the engraving. It does not report the corner angle at all — it reports the number to dial into the saw. One of our own customers returned the AC342 with a comment that is, mechanically, a perfectly accurate product description:
“it’s a quality product, but it doesn’t measure the actual angle. It instead measures settings for the miter saw. useful, but not what i wanted” — AltitudeCraft return comment, AC342 [quoted verbatim]
That is exactly right, and it is the feature. If you want the raw corner angle in degrees, a miter protractor is the wrong tool and a digital angle finder is the right one. If you want to stop doing arithmetic on a ladder, this is the tool.
Two scales, two arrows, crossed over
The confusion runs one level deeper, and it produces our second-most-common complaint. The arms of the AC342 carry their own instructions, laser-engraved:
- MITRE CUT — “Use inner scale reading to set mitre saw settings for an accurate mitre joint cut”
- SINGLE CUT — “Use outer scale to set mitre saw settings for fitting a single piece to an angle”
And the arrows are paired crosswise: you read the outer scale off the inner arrow, and the inner scale off the outer arrow. WEN documents the same convention for its own protractor, so this is an industry pattern rather than one brand’s quirk. Miss it and the tool looks broken. Here is the complaint we get:
“Outer and inner scales don’t lineup. Also the arms can be moved and the scale does not change.” — AltitudeCraft return comment, AC342 [quoted verbatim]
The scales do not line up because they are not supposed to. They are answering two different questions about the same corner: how far to turn the saw when two pieces split the angle, and how far to turn it when one piece takes the whole thing. Seeing two different numbers on the dial at once is the tool working correctly, not a defect. The arms also move independently of the pivot friction, so “the arms can be moved and the scale does not change” usually means the arms were repositioned without changing the angle between them — sliding both along the same two walls does not, and should not, move the needle.
| Inner scale (MITRE CUT) | Outer scale (SINGLE CUT) | |
|---|---|---|
| Read it with | the outer arrow | the inner arrow |
| Use when | Two pieces meet and share the corner — baseboard in a corner, casing mitres, picture frames | One piece is scribed to meet something else — trim dying into a tub, stair skirt to riser, a filler against an out-of-plumb wall |
| What it answers | “How far do I turn the saw so these two pieces close on this corner?” | “How far do I turn the saw so this one piece lands flat on that surface?” |

How to use a miter saw protractor, step by step
Step 1: clear the corner of anything that is not drywall
Old base, caulk ridges, drywall mud build-up and carpet tack strip all push an arm off the true wall plane. A 1/16” bump 6” out from the corner is worth roughly 0.6° of false reading. Pull the old trim or measure above it. The corner you care about is the one the new trim will actually touch.
Step 2: seat both arms flat, and check for daylight
Open the tool into the corner and press both arms against the walls along their full length. Then get your eye down at the surface and look for light under either arm. This is the step people skip, and it is the one that puts the reading out by a degree or two.
Step 3: read the correct ring
Two pieces meeting? Outer arrow, inner scale. One piece fitting to something else? Inner arrow, outer scale. Read it where you took the measurement, and write it on the wall in pencil — do not carry it down the hall in your head.
Step 4: set the saw to that number, unmodified
The number you just read is the saw setting. Do not halve it, and do not subtract it from 90. If you find yourself doing arithmetic at this point, you have read the corner angle off some other tool, not the miter setting off this one — jump to the next section.
Step 5: cut two scraps before you touch the good stock
Cut a short offcut for each side, hold them into the corner and look at the joint from the front. A scrap test costs 30 seconds and catches every class of error at once: a misread scale, a bump behind an arm, a saw whose zero has drifted. For anything you care about, verify your saw’s own zero against a reliable square first — that calibration question is covered in our protractor accuracy and calibration FAQ.

What if you only have a digital angle finder or a school protractor?
Then you do need the arithmetic, because those tools report the corner angle honestly. Use:
Saw setting = (180° − corner angle) ÷ 2
Worked example, 93°. You measure an inside corner and your angle finder reads 93°. Each piece owns half the joint, 46.5°. But the saw reads off 90°, so the setting is 180 − 93 = 87, halved = 43.5°. Set both pieces to 43.5° and the joint closes at 93°. Set them to 46.5° instead and the joint closes at 87° — a 6° gap on a corner that was only 3° out of square.
Worked example, 135°. An octagonal bay or a 45° wall break measures 135°. Setting = (180 − 135) ÷ 2 = 22.5°, which is a stock detent on most saws. The half-the-corner rule would send you to 67.5°, beyond the travel of every common miter saw — a useful sanity check in itself: if the rule hands you a number your saw cannot reach, the rule is wrong, not the saw.
The same relationship is what a miter angle calculator implements, and it is the arithmetic that a two-scale protractor removes from the job entirely.
Outside corners and reflex readings
An outside corner — a wall return, a kitchen island, a chimney chase — is the same problem seen from the other side. Measured from inside the room, the corner is a reflex angle of roughly 270°. You have two equivalent routes:
- Wrap the tool around the outside. The arms sit on the two outside faces and you read the setting directly, exactly as for an inside corner. This is the practical method and what the tool is shaped for.
- Convert a reflex reading. If you have measured 268° with a digital tool, the working angle is 360 − 268 = 92°, and then the standard formula gives (180 − 92) ÷ 2 = 44°.
The arithmetic is identical. What changes is the orientation of the stock: on an outside corner the visible face is the long face, so the mitre runs the other way. Mark your pieces “LONG POINT OUT” before cutting — a correct angle cut in the wrong direction is the second most common way to waste a stick of trim. Stair skirts, rake walls and other non-square work are handled in more depth in our stair trim and non-90° corner guide.
When the setting is real but the saw will not reach it
Most miter saws top out somewhere around 50° each side of zero (check your own scale — the saw in the photo above stops just past 50°). If your correct setting exceeds that — which happens on very acute corners below about 80° — you have three honest options:
- Cut it on the flat. Lay the stock down and use the bevel axis instead of the miter axis, where the range is usually wider.
- Cope one side. On inside corners in painted trim, coping absorbs both the angle error and seasonal wood movement, which a butt mitre cannot. Fine Homebuilding’s coping guide walks through the cut.
- Split the joint unevenly. Nothing requires both pieces to take half — only that the two settings add up. The pair must total 180° − the corner angle. A 78° corner needs 102° total, which is 51° + 51° if you split it evenly, but 50° + 52° works just as well and both numbers are inside a typical saw’s travel. Bias the larger cut onto the piece whose joint line is least visible.
What 31 returns told us about this tool
We pulled every return on AC342 from our own fulfilment data — 31 returns, 22 with written comments. Stripping the logistics noise (“no longer needed”, “bought 2, meant to buy 1”), the substantive complaints fall into exactly two buckets, and both are addressed above or below:
| Theme | Representative comment [verbatim] | What is actually going on |
|---|---|---|
| Expected a raw angle reading | “it doesn’t measure the actual angle. It instead measures settings for the miter saw” | Correct, and by design. Buy a digital angle finder if you want degrees of corner. |
| Scales seem contradictory | “Outer and inner scales don’t lineup” | Inner is half of outer, permanently. Cross-paired arrows. |
| Could not work it out | “I have not been able to figure out how to use it.” | The engraved instructions are on the arms; the missing step is which arrow goes with which ring. |
| Hard to read / too small | “scale is too small to read accurately” · “Too small for determining angles on walls.” | A fair criticism. See the note below — this is a real trade-off, not a misunderstanding. |
On size, we will not argue with the customers. This is a pocket tool: 4.8 oz, arms that ride in a tool-belt pouch. Four separate returns said the dial was hard to read or the arms too short for wall work. If you are laying out long wall runs, or your eyes want a bigger dial, a larger-bodied or digital protractor is genuinely the better buy — we compare the honest trade-offs in our protractor and angle finder comparison. What the small dial buys you is that it is actually in your pouch when you are up the ladder, which is where most angle errors get made.

Crown molding is a different problem
Everything above concerns a flat mitre — trim lying flat against one plane. Crown molding sits on two planes at once, so a single corner reading is no longer enough: you need the corner angle and the molding’s spring angle, and the result is a miter/bevel pair, not one number. Cutting crown nested against a stop preserves the spring angle and keeps you in one-number territory; that method is covered in our crown molding with crown stops guide and the DeWalt crown stop setup walkthrough.

Frequently Asked Questions
What is the formula for a miter saw setting?
Saw setting = (180° − corner angle) ÷ 2, equivalently 90° − half the corner. It returns 45° for a square corner, 44° for 92°, 46° for 88° and 22.5° for 135°.
Why does my joint gap even though I measured carefully?
Most often because the setting was halved instead of converted, which reflects the number across 45° and doubles the error. Check: if your corner was obtuse (over 90°) your setting should have been under 45°, not over.
Which scale do I read on a miter saw protractor?
Inner scale for a mitre joint where two pieces meet; outer scale for a single cut where one piece fits to something else. Read the inner scale with the outer arrow and the outer scale with the inner arrow.
Why don’t the two scales agree with each other?
They are not meant to. Each ring answers a different question about the same corner, so two different numbers on the dial at once is correct behaviour, not a fault. Read the ring that matches the cut you are about to make and ignore the other one.
My corner measures 93 degrees. What do I set the saw to?
43.5° on both pieces. (180 − 93) ÷ 2 = 43.5. Setting 46.5° would leave a 6° gap.
Can I use a speed square instead?
For 90° and 45°, yes. A speed square cannot report an arbitrary corner angle, so it cannot help on the out-of-square corners that cause the gaps in the first place.
What if my miter saw will not go past 45 degrees?
Most saws travel to roughly 50°, which covers corners down to about 80°. Beyond that, cut on the flat using the bevel axis, or cope the inside joint.
Does a digital angle finder remove the need for the maths?
No — the opposite. A digital finder gives you the true corner angle, so you still have to convert it. A two-scale mitre protractor is the tool that removes the conversion, because its scale is pre-halved.
How accurate does this need to be?
Aim for half a degree on painted trim and a quarter degree on stained hardwood, where no caulk will rescue you. Most real-world error comes from debris behind an arm, not from the instrument.
The tool
The AltitudeCraft Precision Aluminum Miter Saw Protractor (AC342) is the two-scale, pre-converted type described throughout this guide: CNC-machined aluminium body, laser-engraved inner (mitre) and outer (single-cut) rings, an O-ring friction pivot that holds its setting from wall to saw, and 4.8 oz in a belt pouch. It reports saw settings, not corner angles — which, as one returning customer correctly observed, is either exactly what you want or exactly what you do not.
Featured in this guide
AltitudeCraft Precision Aluminum Miter Saw Protractor
$20.99
Free shipping & free returns on US orders $25+
View productRelated Articles
 Which Hornady Comparator for 6.5 Creedmoor? Insert, Bushing, and Shoulder Bump Setup (2026)
Oct 15, 2026
Which Hornady Comparator for 6.5 Creedmoor? Insert, Bushing, and Shoulder Bump Setup (2026)
Oct 15, 2026
 How to Center Work in a 4-Jaw Chuck With a Dial Indicator (2026)
Oct 14, 2026
How to Center Work in a 4-Jaw Chuck With a Dial Indicator (2026)
Oct 14, 2026
 Stihl Trimmer Handle Extension: Will One Fit Your Stihl? (2026 Fitment Guide)
Oct 13, 2026
Stihl Trimmer Handle Extension: Will One Fit Your Stihl? (2026 Fitment Guide)
Oct 13, 2026
 BMW N52 A/C Belt: Does Your Engine Have One, and How to Replace It
Oct 12, 2026
BMW N52 A/C Belt: Does Your Engine Have One, and How to Replace It
Oct 12, 2026
