


How to Slide Tandems by Yourself (Without a Spotter)
Yes, you can slide tandems by yourself. A CDC-hosted tip sheet from the TIRES project says only the driver should adjust the tandems. Park straight on level ground, set the trailer brakes, unlock both pins, move slowly to your marked hole, lock the pins and check each one by hand. Never put your body between the tires and the trailer.

The tool for this job
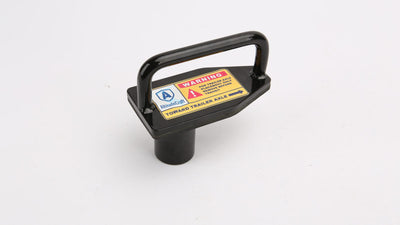
AltitudeCraft Tandem Slide Stopper for Semi Truck
$39.99
Free shipping & free returns on US orders $25+
View productKey Takeaways
- Only the driver should adjust the tandems. That is the advice in a 2019 tip sheet hosted on CDC Stacks, because miscommunication can put helpers at high risk. A spotter mainly tells you when the pin reaches the target hole.
- Work out the holes first. The number comes from your scale ticket and the load on the trailer axles, so decide it before you touch the handle.
- Your real problem is knowing where to stop. A mark on the rail, a hole count, a bar in a hole or a stopper can replace that, and each trades cost against trips out of the cab.
- Finish with checks. Never put your head or body between the tires and the trailer. Lock both pins, check each one by hand, remove anything you placed on the rail, do a gentle tug test and re-weigh before you drive.
AltitudeCraft Tandem Slide Stopper
A magnetic carbon-steel stopper. Insert it a set number of holes from the end of the slider box (the frame that holds the tandem axles) before you slide, so the slider box stops against it. Remove it before you drive. 1-year warranty; a 3-year extended warranty can be applied for on altitudecraft.com.
Can You Slide Tandems by Yourself?
Yes. A 2019 tip sheet hosted on CDC Stacks says: “Only the driver should adjust the tandems to prevent miscommunication that can put helpers at high risk.” It is a one-page “Do the Tandem Slide” sheet, guidance rather than a federal rule.
The sheet comes from TIRES, a project of the Safety & Health Assessment & Research for Prevention (SHARP) program of the Washington State Department of Labor and Industries, supported in part by a CDC/NIOSH grant.

What Should You Do Before You Start?
Before you start, work out how many holes to move, then check the ground and your gear. Weight moved per hole depends on the load on your trailer axles, so use your scale ticket, not a number you remember. The tip sheet adds a short checklist for the ground, your footing and your reach.
- Work out the holes. Weight moved per hole varies with the load: in our complete tandem sliding guide, a 53-foot van with 6-inch holes moves about 150 lb per hole at 12,000 lb on the tandems and about 375 lb at 30,000 lb. The tandem slide chart has the full grid, and the Federal Highway Administration lists the federal limits on its Bridge Formula Weights page.
- Park straight, on level ground. “Align the truck and trailer on level ground to reduce tension on the release latch.”
- Look before you step out. Check for debris, ice, oil or holes in the ground, use three points of contact, and wear reflective clothing outside the truck.
- Bring a way to reach the handle. “Use an extension rod to reach the latch handle instead of bending your back, twisting your shoulder, or placing yourself between the tires and trailer.”
- Wear gloves and take your time. The sheet says to “give yourself plenty of time to do the job right.”
How Do You Slide Tandems Alone, Step by Step?
You slide tandems alone in eight moves: park, work out the holes, mark the target, set the trailer brakes and unlock the pins, move slowly, stop and check against your mark, let the pins seat, and verify both pins. Tractor controls differ, so treat this as a general order and follow your carrier’s procedure where it differs.
The order follows the tip sheet and the public 16-step guide on a carrier’s recruiting blog, rewritten for one person.
- Park straight on level ground, away from traffic, with the tractor and trailer in line.
- Work out the number of holes from your scale ticket.
- Mark the target. Use a paint marker or chalk on the rail at the hole where the front locking pin should land.
- Set the trailer brakes and unlock the slider pins. Use an extension rod if you would otherwise bend or twist to reach the handle.
- Get in, release the tractor brakes only, and move slowly in the direction you worked out. The tandems stay put on the pavement while the trailer slides over them; the sliding guide explains which way is which.
- Stop, set the brakes and get out. Check where the front pin sits against your mark. Repeat in small moves until it lines up.
- Let the pins go into the holes. Rock the tractor gently so they seat, and let the handle go all the way in.
- Check both pins. Make sure each one is fully through its rail hole, do a gentle tug test, then re-weigh before you drive.

The weak point for a solo driver is step 6: you cannot see the pin from the cab, so every check means setting the brakes and climbing down.
How Do You Know When to Stop Without a Spotter?
You know when to stop by giving yourself a checkpoint that does not need a second person: a mark on the rail, a hole count, a bar in a hole, or a stopper the slider box meets. Each trades cost against trips out of the cab. These comparisons are our own reasoning, not test results.
Mark the target hole
Draw a line with a paint marker or chalk at the hole where the front locking pin should land. The carrier guide lists the same step: “Mark the hole you want the front locking pin to land.” It costs almost nothing, but you judge the match by eye and check after each move.
Count the holes
Count the holes between the current pin position and the target, then check the count as you creep. A miscount is easy in the dark, or when dirt, ice or old paint hides a hole.
Put a bar or pin in a hole
Some drivers report using a pry bar or a spare pin as a makeshift stop. We do not describe how to place one. It can slip, bend or get left on the rail, and you need your hands near the rail to set it.
Use a purpose-made stopper
A stopper is a physical stop made for the job, set before the slide so the slider box meets it. It costs money, it has to suit your rail, it needs your hand at the rail to place and remove, and it must come off before you drive.

The first two need no tool, and some drivers report using only a mark and a hole count. The price is more trips in and out of the cab and a final judgment made by eye. Drivers in online trucker communities also describe holding the slider handle out with elastic cords or locking pliers. That keeps the handle pulled out but does not tell you where to stop, and each pin must still go fully into its hole.
How Do You Slide Tandems Alone With a Stopper?
To slide tandems alone with a stopper, you set it before you move, so the slider box stops against it where you planned. The sequence has six steps, from deciding the holes to a gentle tug test. The AltitudeCraft Tandem Slide Stopper is a carbon-steel unit with a built-in magnet and a silicone pad.
- Decide how many holes you want the tandems to move.
- Insert the stopper that many holes from the end of the slider box, on the side the tandems move toward.
- Set the trailer brakes (red knob out) and release the tractor brakes (yellow knob in). Unlock the slider pins.
- Slowly move the tractor until the slider box stops against the stopper.
- Lock the slider pins. Check that every pin is fully through the rail holes.
- Remove the stopper, then do a gentle tug test before you drive.

Placing and removing the stopper means reaching in at the end of the slider box, close to the tandem wheels on the side the tandems move toward. Do it with the brakes set, use your hand only, and keep your head and upper body out of the gap.


The stopper is a placement aid, not part of the tandems. Take it off before you drive: its warning label reads “REMOVE BEFORE TRANSIT,” and the pins you lock in step 5 are what you check before pulling away. It weighs 1.08 kg (about 2.38 lb) and its pin is 1.5 in (38 mm) across.
Check fit before you buy. Rail hole size and spacing vary between trailers, and the stopper is made for trailers with sliding tandems, such as dry vans and reefers. Our article on dry van and reefer trailers and the slide stopper FAQ cover fit in more detail.
Which Method Is Right for You?
The right method depends on how often you slide and how much climbing in and out you will accept. A mark and a hole count cost nothing but time and trips; a stopper costs $39.99 on altitudecraft.com as of October 2026. The table compares the options in general terms.
| Method | Cost | Trips out of the cab | Main risk | Suits |
|---|---|---|---|---|
| Mark the hole | Almost free | Several: you check after each move | Judged by eye | Occasional slides |
| Count the holes | Free | Several | Miscount in the dark or on dirty rails | Drivers who know their trailer |
| Bar or pin in a hole | Whatever you already carry | Fewer, but you still check the pins | Slips, bends, gets left behind; hands at the rail | Not our pick |
| Stopper (AltitudeCraft Tandem Slide Stopper) | $39.99 | Generally fewer: the slider box stops against it, but you still confirm the pins | Must suit your rail; hand at the rail to place and remove; must come off before you drive | Frequent slides |
Our judgment: if you slide a few times a year, a mark and a hole count are usually enough. If you slide every week, the repeated climbing and checking is what the AltitudeCraft stopper reduces. For a closer look at stopper styles, see our magnetic vs manual comparison.
What Are the Safety Rules When You Slide Alone?
The main rule is never to place your head or body between the tires and the trailer. The tip sheet states why: “Placing your head or upper body between the trailer and tires can cause severe or deadly crushing injuries.”
- Reach with a rod, not your body. An extension rod gets you to the handle without bending, twisting or leaning in.
- Clear the area before the truck moves. Before you release the tractor brakes, be in the cab and check that nobody is near the tires or under the trailer.
- Use a flashlight, not your head, to see a pin. Keep your head and upper body out of the gap.
- If you overshoot, stop. Set the brakes and get out before you adjust.
- Check every pin. “Before pulling away, check all locking pins to make sure they are firmly secured in the slide rail holes.”
- Remove anything you placed on the rail. The tip sheet also says to report mechanical problems to your supervisor or maintenance shop.
The sheet also suggests: “Consider using a tandem stopper tool to remove the need to frequently check the locking pins or to use a helper.” That is a general suggestion about the tool type, not an endorsement of any product.
What Goes Wrong When You Slide Alone?
Solo sliding goes wrong where nobody is there to catch a skipped check, so the fix is a habit rather than a tool. These six habits cover the common gaps, and they are our own reasoning. Run through them before you release the tractor brakes.
- Getting out without setting the tractor brakes again. Set them every time you climb down to check.
- Carrying on when you cannot see your mark. If dirt, ice or poor light hides it, stop and clean the spot rather than guess.
- Leaning in to see a pin. Use a light and stay out of the gap.
- Leaving your marker or tool on the rail. Make removing it part of the last step.
- Taking a big move on a hunch. Move slowly and check, or let a stopper do the stopping.
- Skipping the last checks. Check each pin by hand, do the tug test and re-weigh.
Frequently Asked Questions
Can you slide tandems by yourself?
Yes. A 2019 tip sheet from the TIRES project, hosted on CDC Stacks, advises that only the driver adjust the tandems. The solo problem is knowing where to stop.
Do you need a spotter to slide tandems?
No. A spotter mainly tells you when the pin reaches the target hole, and the tip sheet warns that miscommunication can put helpers at high risk. A mark, a hole count or a stopper can replace that job.
How do you know when to stop sliding tandems?
Set a checkpoint before you move: mark the target hole, count holes or set a stopper for the slider box to meet. Afterward, check that each pin is fully through its rail hole.
Is it safe to slide tandems alone?
It can be done with care. The tip sheet calls sliding a common task that can be dangerous, citing shoulder and back injury from reaching and crushing injury between the tires and trailer. Use an extension rod and check every pin.
Can you slide tandems without any tools?
Yes, with a paint-marker line and a hole count, at the cost of more trips in and out of the cab.
Do I take the stopper off before I drive?
Yes. The warning label reads “REMOVE BEFORE TRANSIT.” Take the stopper off the rail, then check that the locked slider pins are firmly secured before you pull away.
Related Articles
- Sliding Tandem Axles: The Full Trucker Guide
- Tandem Slide Chart: How Much Weight Moves Per Hole
- Tandem Slide Stopper: Magnetic vs Manual Compared
- Tandem Slide Stopper for Dry Van and Reefer Trailers
- Tandem Sliding Guide: all our articles in one place

Set the stop before you slide.
AltitudeCraft Tandem Slide Stopper: magnetic, carbon steel. Remove it before you drive. 1-year warranty; a 3-year extended warranty can be applied for on altitudecraft.com.
By AltitudeCraft Gear Lab. AltitudeCraft Gear Lab is the product team behind AltitudeCraft tools. Disclosure: AltitudeCraft makes the Tandem Slide Stopper mentioned in this article; no other brands are named. This guide reflects public sources and our own reasoning, not a product test, and it does not replace your carrier’s procedure or training. Sources: “Tip Sheet: Do the Tandem Slide,” TIRES project, SHARP program, Washington State Department of Labor and Industries, 2019 (hosted on CDC Stacks); Federal Highway Administration, Bridge Formula Weights; Schneider carrier blog, “Sliding tandems on a trailer: 16 simple steps to follow.” Last updated: October 2026.
Featured in this guide
AltitudeCraft Tandem Slide Stopper for Semi Truck
$39.99
Free shipping & free returns on US orders $25+
View productRelated Articles
 Tandem Slide Calculator: How Many Holes to Slide (Free, 2026)
Oct 28, 2026
 Gifts for Truck Drivers 2026: Useful Picks Truckers Actually Use
Oct 22, 2026
 16 vs 24 Stud Spacing: When 24 On Center Is Allowed (and When It Isn't)
Oct 28, 2026
 How to Adjust Glock Sights: Which Way to Push the Rear Sight and How Far (2026)
Oct 27, 2026
