


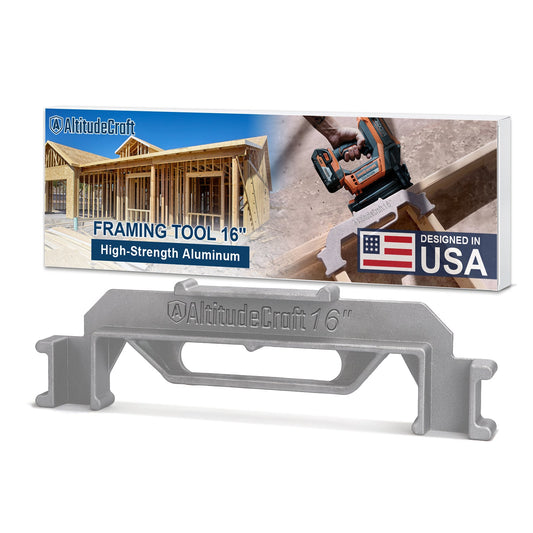


Framing Jig: Why Every One Has Play, and When It Beats a Tape (2026)
A framing jig is a fixed-width spacer that holds a stud at the correct on-center distance while you nail it, so you can lay out a wall without pulling a tape for every bay. That is the whole idea. What almost nobody tells you before you buy one is that every framing jig on the market has slop in the stud pocket, that the first bay of a wall is the one bay a jig cannot set, and that the tool quietly assumes you are building your wall flat on the deck and standing it up afterward.
We know this because we sell framing jigs and we read the returns. Across 277 returns of our own 12", 16" and 24" framing tools, 74 of them — 26.7% — were ORDERED_WRONG_ITEM or NOT_AS_DESCRIBED. Those are not manufacturing failures. Those are people who bought a tool that could not do the job they had in mind. This article is the page we wish those 74 buyers had read first.


The tool for this job
AltitudeCraft 16 Inch Precision Framing Stud Layout Tool
From $42.99
Free shipping & free returns on US orders $25+
View productWhat a framing jig actually does — and three things it does not do
Strip away the marketing and a framing jig does exactly two jobs: it sets the clear distance between the last stud and the next one, and it holds the new stud perpendicular to the plate while you fasten it. Everything else is a claim you should check.
Three jobs a framing jig does not do:
- It does not plumb your studs. Spacing and plumb are separate problems. As Fine Homebuilding's shop-made jig article puts it, "this jig only ensures proper spacing between studs, but it is just as important to make sure that studs are plumb."
- It does not set the first bay. The first bay is a different width from every bay after it. More on that below.
- It does not fix crowned or twisted lumber. A stud with a bow in it will not sit flat against a jig pocket no matter how tight the pocket is.
Why every framing jig has play in the stud pocket
This is the single most common complaint we see, and it is the one that is almost always misdiagnosed as a defect. Five separate buyers wrote us versions of the same sentence:
"This framing tool fits tight on the header but way too loose on studs! 1/4" of play!"
"Does not fit 2x4 studs tightly which makes it difficult to align them straight. Too much play."
"Much too loose to get accurate 16 on center alignment"
"Space for 2x is larger than the 1.5" stated"
"Item shifts a lot when trying to screw in"
The last one is the tell. That buyer measured the pocket, found it wider than 1½", and concluded the tool was made wrong. It was not. A nominal 2× is not always 1½" thick.
The American Softwood Lumber Standard, PS 20 — the US Department of Commerce voluntary product standard that every piece of dimension lumber sold in the country is graded against, maintained through NIST — publishes two size schedules for the same nominal size, one for dry lumber and one for green (unseasoned) lumber. They are deliberately different, so that both products end up approximately the same size once they reach equilibrium in service.
| Nominal size | Dry (S-DRY, ≤19% MC) | Green (S-GRN) | Difference |
|---|---|---|---|
| 2x4 thickness | 1½" | 1‑9/16" | 1/16" |
| 2x4 width | 3½" | 3‑9/16" | 1/16" |
| 2x6 width | 5½" | 5‑5/8" | 1/8" |
Now do the arithmetic a tool designer has to do. If you cut the stud pocket at exactly 1.500", roughly half the material on a lumber yard rack — anything sold green, anything that has picked up moisture on a wet job site — physically will not enter the pocket. A tool that jams is a tool that gets returned immediately. So every manufacturer, ours included, cuts the pocket oversize. The play is not a defect. It is the design tolerance that lets the tool accept real lumber.

The fix: reference one face, every time
Play only becomes error if it is random. If your stud sits against the left wall of the pocket on one bay and the right wall on the next, you have injected the full pocket clearance as a spacing error, and it compounds down the wall. If you push every stud against the same wall of the pocket, the clearance becomes a constant offset — and a constant offset does not accumulate.
Practically:
- Pick a reference direction before you start — we suggest always pushing the stud away from the wall's starting corner.
- Seat the stud against that face of the pocket with your knee or your off hand before you shoot the first nail.
- Check the running dimension with a tape every four to six studs, not every stud. At 16" on center, stud number 4 should land with its center at 64" from your layout origin.

That third step is the one people skip. A jig is a relative tool: each bay is measured from the previous stud, so any error carries forward. A tape is an absolute tool measured from a fixed origin. Using both — jig for speed, tape as a periodic audit — is how you get the speed without the drift.
The first bay is the one bay a jig cannot set
Standard 16" on-center layout does not start at 16". You mark the near edge of the first interior stud at 15¼" so that the stud's center lands at 16", and every 4-foot sheet edge after that breaks on the center of a stud. That geometry gives you a 13¾" clear opening in the first bay and 14½" in every bay after it — assuming a single 1½" end stud. (Fine Homebuilding's shop-made jig uses 13⅝" on its first-bay side, which reflects a slightly different corner detail; the number changes with your corner assembly, the principle does not.)
A single-width framing jig has one pocket spacing. It cannot produce both 13¾" and 14½". So the correct workflow is: set the first stud by tape, then jig everything after it. If you jig from the corner, every drywall and sheathing joint on that wall lands ¾" off the framing. We wrote the full derivation in our complete guide to 16-inch on-center stud layout, and the recovery procedure when it has already happened in studs not lining up: how to fix 16 OC layout errors.
The workflow a framing jig quietly assumes
One returned tool came back with this note:
"The design of this tool only allows it to be used when building a wall frame on the floor then putting it in place"
That buyer was right, and it is the most useful sentence in our entire returns dataset. Framing jigs are built around platform framing: you lay the top and bottom plates on the deck, assemble the wall flat, then tilt it up. Flat on the deck, gravity holds the stud in the pocket and both your hands are free.
If you are doing any of the following, a spacer jig is the wrong tool and you should not buy one:
- Sistering or replacing studs in an existing, standing wall
- Stick-framing in place, one stud at a time, against an existing top plate
- Furring out a masonry or concrete wall
- Retrofit work where the plates are already fastened
There is one important exception, and it comes from the pros. On a rake wall — a wall with a sloped top plate, like a gable end — you can only lay out the bottom plate, because every stud is a different length and the top plate crosses at an angle. A jig that positions the stud's top end becomes genuinely useful. As one Garage Journal member put it in a long-running framing jig thread: "For a sloped top plate rake wall this is what I planned to use this on where u can mark bottom plate only."

Framing jig vs. 14½" block vs. layout stick vs. tape
The honest comparison is not "jig versus tape." Working framers rarely compare a jig to a tape — they compare it to a cut block or a layout stick. Here is the full field.
| Method | Cost | Holds the stud? | Error behavior | Best for |
|---|---|---|---|---|
| Cut 2x4 block (14½" for 16" OC) | Free | No — spacer only | Relative; compounds | Anyone with a saw and a scrap pile |
| Framing jig (metal, pocketed) | $40–$90 | Yes — acts as a third hand | Relative; compounds, but pocket is repeatable | Solo work, rake walls, occasional framers |
| Layout stick | $100–$250 | No — marks only | Absolute across the whole plate | Production framing crews |
| Tape and pencil | Free | No | Absolute from one origin | Short walls, verification passes |
The cut-block crowd is loud and they have a point. From that same forum thread: "I have just cut a scrap piece of 2x4 to 14.5" and used that...maybe I should patent it." The rebuttal came from another member in the same thread, and it is the real argument for buying a tool: "I do the same use 14.5" scraps but the scraps always seem to disappear or one of the guys helping me throws them out."
Production framers are blunter still. "Might be good for an endless wall of just studs, but useless in the real world," wrote one. The workflow objection is specific and fair: "Without it you're grabbing studs with one hand and holding the gun in the other. With it you'd be putting down and picking up the gun so you can align this thing every time." If you frame for a living with a nailer in your hand all day, a layout stick that marks an entire plate in one pass beats any spacer, because it never interrupts the nailing rhythm.
That is not most people buying a framing jig. Most are framing a basement, a garage partition, or a shed — solo, occasionally, without a helper to hold the stud. That is the job the jig wins.
16" or 24" on center — and which jig size you actually need
Get this wrong and you buy the wrong tool. In our returns data, size confusion is its own cluster: "No longer needed not that correct length for the application I'm working on," "too long," and a run of comments from people who meant to order the 16" and clicked the 12" or 24".
| Spacing | Clear opening between 2× studs | Typical use | Batt insulation width |
|---|---|---|---|
| 12" OC | 10½" | Heavily loaded or short-span framing, some stair walls | Cut to fit |
| 16" OC | 14½" | The default for 2x4 walls and most residential framing | 15" / 15¼" |
| 24" OC | 22½" | Commonly paired with 2x6 walls; advanced framing | 23" / 23¼" |
On the code side, IRC R602.3.1 does not state a spacing directly — it points you at Table R602.3(5), which sets stud size, maximum height and maximum spacing together. In practice 2x4 bearing walls land at 16" on center and 24" on center is generally paired with 2x6 studs, and the IRC separately restricts utility grade studs to no more than 16" on center, no more than a roof and ceiling of load, and no more than 8 feet in height on exterior and bearing walls. Read your local adopted table before you commit — your AHJ, not a blog post, is the authority.
One compatibility note that comes straight from a return: "Doesnt work with 2x6." A jig sized around a 2x4 wall registers on 3½"-wide plates. If you are framing 2x6 exterior walls, confirm the tool is rated for 5½" plates before ordering. Our framing layout tool FAQ on 16 vs 24 OC, rafters and accuracy covers the spacing decision in more depth.

When a framing jig is worth buying — and when to skip it
Our own returns argue against selling one to everybody, so here is the honest split.
Buy one if: you are framing solo and need something to hold the stud while you shoot it; you are building rake walls or anything where only the bottom plate can be laid out; you frame a few times a year and do not want to re-cut and re-lose a spacer block on every job; or you are new enough to framing that a physical stop is worth more to you than a pencil line.
Skip it if: you frame full time with a nailer in hand — get a layout stick; you are working in standing walls or doing retrofit; your walls are short enough that a tape is genuinely faster; or you have a helper, in which case the jig's third-hand advantage evaporates.
If you have decided a jig fits your work, our 24" framing jig and 16" stud layout tool are both cast aluminum, and the full range including the two-piece sets is in the Stud Master framing tools collection. If you would rather see the category compared side by side before you spend anything, we tested seven of them from $5 to $90 in best framing layout tools.
Frequently Asked Questions
Why does my framing jig have a gap around the 2x4?
Because PS 20, the American Softwood Lumber Standard, defines two different sizes for the same nominal 2×: 1½" thick when dry and 1‑9/16" thick when green. A pocket machined to exactly 1½" would refuse any green or moisture-swollen stud, so every manufacturer cuts it oversize. Seat every stud against the same face of the pocket and the clearance becomes a constant offset instead of a random error.
Is a framing jig more accurate than a tape measure?
No — it is faster, not more accurate. A jig measures each bay from the previous stud, so small errors accumulate down the wall. A tape measures from a fixed origin, so it does not. The reliable method is to jig for speed and verify with a tape every four to six studs; at 16" on center, the fourth stud's center should sit at 64" from your origin.
Can I use a framing jig on a wall that is already standing?
Generally no. Spacer jigs assume platform framing, where the wall is assembled flat on the deck and tilted up. In a standing wall you have no gravity holding the stud in the pocket and usually no access to both plates. For retrofit and sistering work, lay out with a tape and a speed square instead.
What is the clear distance between studs at 16 inches on center?
14½". On-center means center-to-center, and a nominal 2× is 1½" thick, so 16" − 1½" = 14½". The first bay is the exception: with a single 1½" end stud and the first interior stud's near edge marked at 15¼", the first clear opening is 13¾". That is why a single-width jig cannot set the first bay.
Will a 16-inch framing jig work on a 2x6 wall?
Not unless it is specifically rated for it. A 16" jig is dimensioned around 3½"-wide 2x4 plates; 2x6 plates are 5½" wide. This is a real return reason in our data — one buyer's entire feedback was "Doesnt work with 2x6." Confirm plate width compatibility before ordering.
Do I need a jig for 24 inch on center framing?
Only if the spacing suits your wall. 24" on center gives a 22½" clear opening and is usually paired with 2x6 studs; 2x4 bearing walls typically stay at 16" on center. Check IRC Table R602.3(5) as adopted locally, then buy the jig that matches the spacing your plan calls for — not the one that looks like a better deal.
Why do professional framers say framing jigs are useless?
Because their alternative is not a tape — it is a layout stick that marks a whole plate in one pass, letting them nail without interruption. A jig requires setting the nailer down for each stud. That objection is correct for production framing and largely irrelevant for a homeowner framing a basement alone on a Saturday.
Featured in this guide
AltitudeCraft 16 Inch Precision Framing Stud Layout Tool
From $42.99
Free shipping & free returns on US orders $25+
View productRelated Articles
 Why Car Electrical Connector Tabs Break (and How to Disconnect Them Without Damage)
Aug 02, 2026
Why Car Electrical Connector Tabs Break (and How to Disconnect Them Without Damage)
Aug 02, 2026
 Studs Not Lining Up? How to Fix 16 OC Layout Errors (2026)
Apr 02, 2026
Studs Not Lining Up? How to Fix 16 OC Layout Errors (2026)
Apr 02, 2026
 Silverado A/C Belt: Which GM Truck Belts Are Stretch-Fit, and Which Tool Fits (2026)
Oct 20, 2026
Silverado A/C Belt: Which GM Truck Belts Are Stretch-Fit, and Which Tool Fits (2026)
Oct 20, 2026
 30-30 Overall Length for Lever Actions: How to Find Yours (and When an OAL Gauge Won't Help)
Oct 19, 2026
30-30 Overall Length for Lever Actions: How to Find Yours (and When an OAL Gauge Won't Help)
Oct 19, 2026

1 comment
Why buy a framing jig. Seems like you could make one for a couple of bucks. Cut a two by four at 26." Nail two or four 2X6" brackets on 1 side at 16" and 24" on center, and two 2X4 brackets on the other side voila’! – 16" and 24" centers. Seems to me that would work nicely. No? Tell me why, please!